The Ultimate Guide to DIY Campervan Furniture (2025)
- Shane Monks O'Byrne
- Dec 22, 2022
- 29 min read
Updated: Feb 27
Woodwork might be the most beautiful and challenging of the trades. It is one part of a van conversion that is completely unavoidable. In this article you will learn everything you need to know about campervan furniture. We will go deep on tools, joinery & cabinetry, colorants & finishes, as well as a bunch of tips & tricks. Taking 15 minutes to read this article will save you a lot of time and money down the road. Let's jump in.
Index
Shane, the founder of The Van Conversion, is a campervan professional dedicated to helping people transform ordinary vans into homes on wheels. He authored Roaming Home and teaches The Van Conversion Course, guiding many people through their van builds. Shane also writes The Van Conversion Newsletter, where he shares practical tips and insights. After completing two van builds and living on the road full-time since 2020, he is passionate about sharing his expertise with others.
This post contains affiliate links, which means that if you click a product link and buy anything from the merchant (Amazon, eBay, etc.) we will receive a commission fee. The price you pay remains the same, affiliate link or not. By using these links, you are helping us to continue writing free educational content. To understand our policies on content, affiliate commissions, and liability, please review our Terms of Use.
Did you know you can get a free electrical wiring diagram by signing up for The Van Conversion Newsletter?
Design the Campervan First
Before hopping into carpentry and campervan furniture making, it is essential that you mock it up on paper or with CAD software first. Here is a full guide on campervan design that will help you get started.
I highly recommend Vanspace3D for designing your campervan interior - it's an awesome drag n' drop CAD tool specifically for van conversions.
Supplies List
For driving and drilling | |
For straight-line cutting | |
For bevels, chamfers, and grooves. Very useful in furniture-making. | |
For making accurate angled cuts (cheaper alternative to a mitre saw) | |
For cutting circular holes in wood and metal | |
For nuts & bolts | |
For nuts & bolts | |
Black & Decker Woodworking table (sawhorse) A sawhorse is essential for woodwork. Something to cut wood on. | |
 | |
For helping you cut in a straight line on plywood | |
A selection of clamps A woodwork essential. Grab a few of these. | |
Accurate 90 degree cuts | |
For cutting wood flush to an uneven surface | |
Woodworking Tools for Making Campervan Furniture
Drill / Screwdriver
A combi drill is one of the most important tools you will need for a successful van conversion. These days, you can buy an all-in-one screwdriver + drill.
The anatomy of a combi drill
The head of the drill is known as a chuck. We can insert different bits into the chuck depending on our need.
You will find a series of numbers around the chuck; these numbers let you select the torque when screwing screws. Selecting a torque setting will stop the driver from screwing when you hit a certain resistance. This prevents you from over tightening a screw.
Higher torque number = Higher resistance threshold
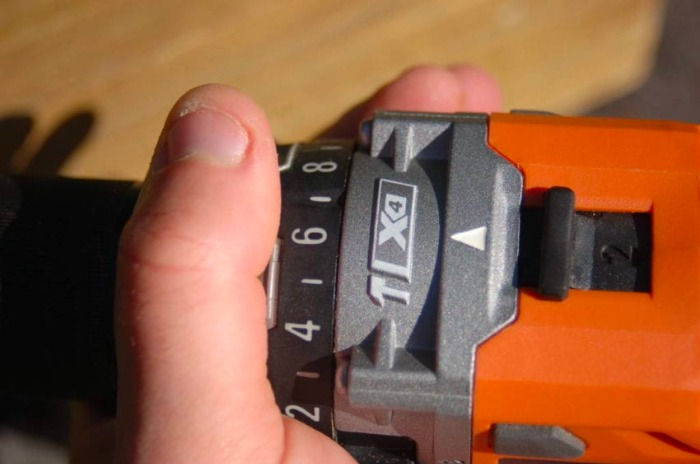
At the end of the numbers is a drill icon, this setting tells the tool that you are drilling and therefore it should have no max torque.
The speed (RPM) of a drill is usually controlled by pressure on the trigger, but some drills have a speed selector, similar to the torque selector.
Drill bits and Driving bits
Bits are inserted into the chuck of the drill. There are two types of bits:
Drilling bits
Driving bits (for screws)
Drilling bits
There are 5 primary types of drill bits we need to concern ourselves with, they are:
Helical bits - The 'normal' bit for drilling holes
Spade - For larger diameter holes
Countersink - To countersink screws (make them flush with a surface)
Forstner - For installing hinges / dowels
Hole saw - For cutting really big holes with precision

Other drill bits that can come in useful are:
Wire brush drill bit - Removing rust from metal
Pocket hole jig - A woodwork jig with a special bit. For driving screws at an angle
Most drill bits you will encounter are made from High Speed Steel (HSS). If the bit has no coating on it (ie. a clear steel color), it should only be used on PVC, thin metal, and softwood. If the bit is black in color, it means it is treated with black oxide and can be used on thicker metal and harder woods.
Driving bits (screw heads)
A modern drill can also be used to drive screws. There are many different driving bits we can use depending on the types of screw we are using.
A quick note on camming out:
Camming out is a process by which a screwdriver slips out of the head of a screw being driven once the torque required to turn the screw exceeds a certain amount. Repeatedly camming out damages the screw, and possibly also the screwdriver, and should be avoided. This is one reason that there are so many types of driving bits... some screw heads cam-out less than others.
Types of driving bits
Flat head:
The original screw head. Super simple, but very easy to cam out (strip)

Phillips:
The improvement on the flat head - the plus shape makes it cam out less. This is the most common type of screw.

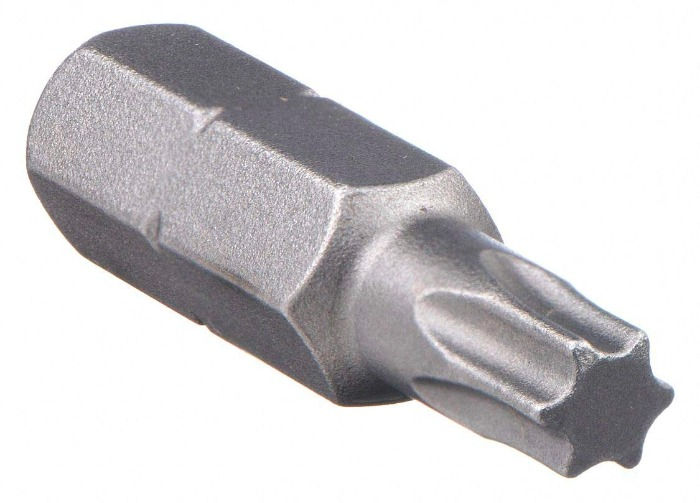
Torx:
One of the most modern types of screws and becoming increasingly popular. They have a strong resistance to camming out, though are usually a bit more expensive.
Other bits that you may come across are:
Allen (hex)
Robertson (square)
Pozidrive (v. similar to the phillips)
Self tapping vs. self drilling screws
A self tapping screw is what we think of as a 'normal' screw. To screw into sheet metal with a 'self-tapper' we need to first drill a pilot hole, then we can screw in the self-tapper. In contrast a self drilling screw has a drill bit on the end that allows it to punch through sheet metal without having to first drill a pilot hole.
Self drilling screws are often used to attach tongue & groove or plywood panelling to the back or side doors of your van.

Flat vs. pan head screws
A flat screw (fig. e. below) is the most common type of screw you will use. There is no need to countersink a flat screw as it should countersink itself.
In contrast, a pan head screw (fig. a) has a rounded head. In order to get this type of screw flush with a surface we would need to countersink it.

How many screws do you need for a van conversion?
Though it varies from van to van, most conversions will require upwards of 1500 screws!
Bolts
Bolts are used for fastening two objects together when you expect there to be shear force. Shear forces is the pull of two planes in opposing directions.

Screws are not designed to take shear force.
One place in a van conversion where we use a bolt is to attach the wooden stud framing to the structural support beams on the roof. We screw tongue and groove cladding / plywood into the stud framing, putting a lot of weight on it and adding sheer force. Therefore we should use a bolt rather than a screw.
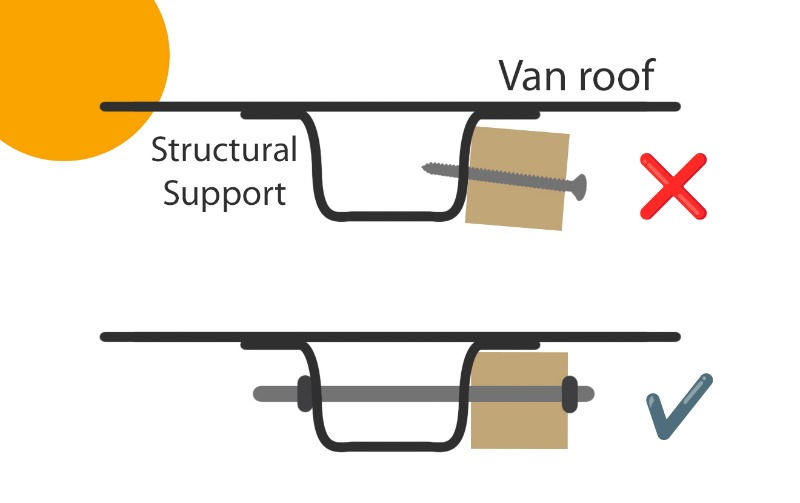
While you can get bits for a drill that will drive bolts, it is more common to use a ratchet / socket wrench.
Drilling to a certain depth
Sometimes you need to drill to a specific depth. To do this, you can simply place some electrical tape on the drill bit at the point you intend to drill to.

Circular saw
A circular saw is used to cut wood in straight lines - it is one of the tools you will use most often in your van conversion.
There are many types of blades you can get for a circular saw (like any power tool). As a general rule of thumb: Large and widely spaced teeth will cut faster but give a rougher finish.
In the image below, the blade on the far left is known as a pointed-tooth blade and is the most common blade you will use. It cuts most wood easily and leaves a reasonable finish.
No matter what blade you use, you must ensure it is sharp! A dull blade is not only dangerous, but it also leaves a very poor finish on the wood. From personal experience, I have badly charred some nice wood from using a dull circular saw blade.
Jigsaw
If you could use only one tool for your entire van conversion, it would have to be the jigsaw. This miracle tool does so, so, so much. While it can cut wood in a straight line, what it really excels at is cutting curves.
A jigsaw with large and widely spaced teeth will cut faster but give a rougher finish.
Note: If you plan to cut metal with your jigsaw (eg. when installing a window), you need a metal cutting jigsaw blade.
Router
A router is an extremely useful, multi-purpose tool. Yes, it could be considered optional for a van build; but with so much it can do, I think it is an excellent purchase.
Caution: Whilst we must be cautious with all power tools, we need to be extra cautious with this one! If your finger gets caught in the router, it will be completely eaten up with nothing left to re-attach.
In a nutshell, a router cuts a channel in a straight line.
There are two common uses for a router in a van conversion:
Cabinetry - building cabinets & fitting shelves
Finishing the edges of wood and making them look beautiful

There are many different bits you can use in a router to get the desired effect.
The most common bits are:
Rabbet
Flush trim
Roundover
Straight cut

In fact, it's quite amazing just how ornate router bits can get!

How to use a router:
The collet holds the router bit - you need wrenches to replace a route bit
You can set the depth of router by adjusting the height of the base
Oftentimes a router bit will come with a ball bearing - this allows it to move along the wood smoothly. The ball bearing is located at either the top or bottom of the bit depending on your needs.
Most of the time you will want to use a 'fence' with your router - this allows you to do straight cuts. A fence is an attachment that frequently comes with the router.
To achieve a deep cut, use a series of shallow passes rather than just one deep pass. It will look better and put a lot less wear on your router.
Run the router up the right side of the wood you are cutting. This is known as 'conventional milling' and gives the best results.
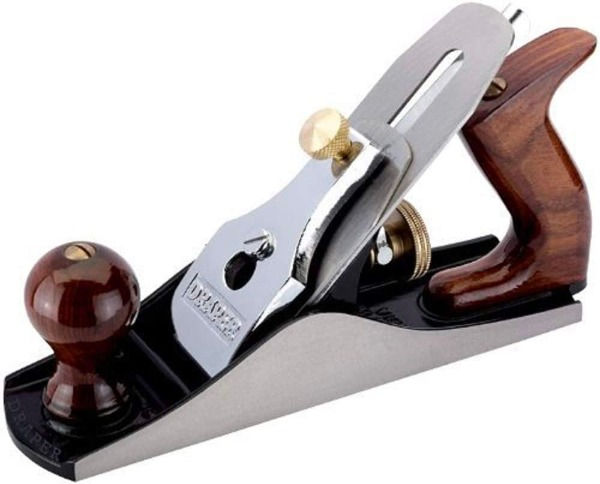
Plane
A plane is another 'optional-but-very-useful' tool. It is used for removing rough surfaces on wood and for reducing it to size. In a van conversion it is often used for making wooden studs flush with the metal interior of the van.
You can go deep down the rabbit hole with these beautiful tools. They are tricky to use, but very satisfying.

Other tools
The combi drill, circular saw, jigsaw, and router are the main tools you will use for a van conversion. However, there are some other useful tools you should know about:
Woodworking bench:
A woodworking bench is 100% necessary. This is a solid & sturdy surface upon which you will do all your cutting. You can buy one or build one yourself.
Mitre saw:
A mitre saw is very nearly a necessary tool - though it doesn't quite make the list; It is high up on the 'optional' list. A mitre saw allows you to accurately make angled cuts in wood (eg. 45 degree cuts for mitered butt joints).
You can get around buying a mitre saw by using a speed square or a mitre block.
Table saw:
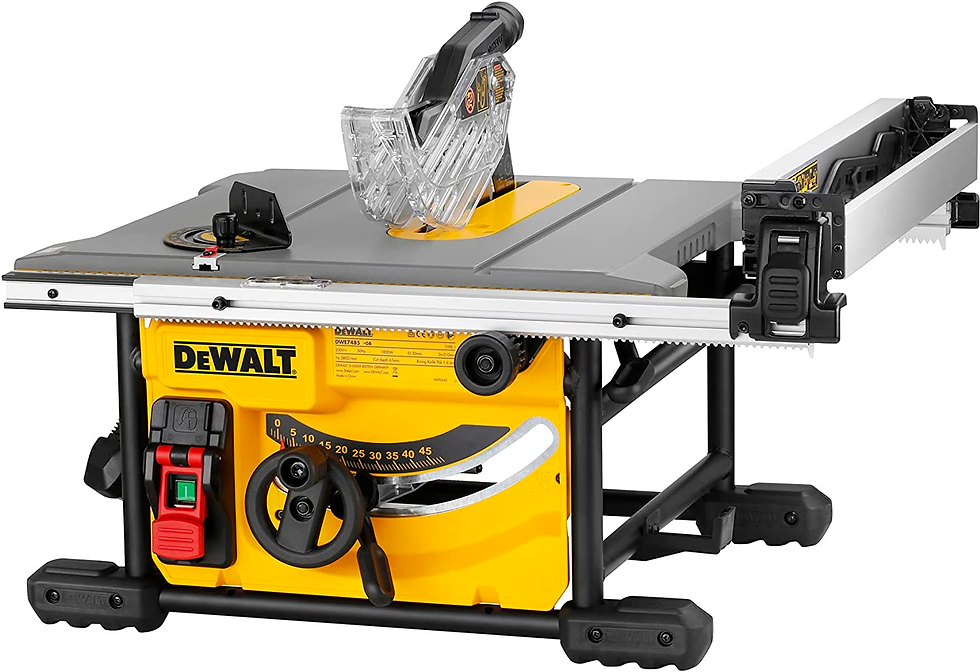
A table saw is a nice luxury when converting a van. If you are an avid woodworker, it is highly recommended. It is essentially a woodworking bench with a built-in circular saw. It allows you to quickly and easily make accurate straight cuts.
Power tool safety
Power tools are mega dangerous. Here is some safety advice (please, please read this):
Always wear eye & ear protection
Don't wear loose clothing or jewelry
Do not cut anywhere near the power cable
Unplug the power tool before making adjustments
Always clamp the wood you are cutting securely
Only use sharp blades
Cutting wood - What you wished you knew before you began building camper van furniture
Nominal vs. actual dimensions
Did you know that the dimensions listed on a piece of lumber are not the real dimensions? When you take a measuring tape out, you will find that the wood is probably ~1/2" shorter than listed. The listed dimension is known as the nominal dimension, the real dimension is known as the actual dimension.
Part of the reason for this is that when wood dries after being felled, it shrinks quite considerably.

It is important to keep this fact in mind when doing the carpentry for your van conversion.
Kerf
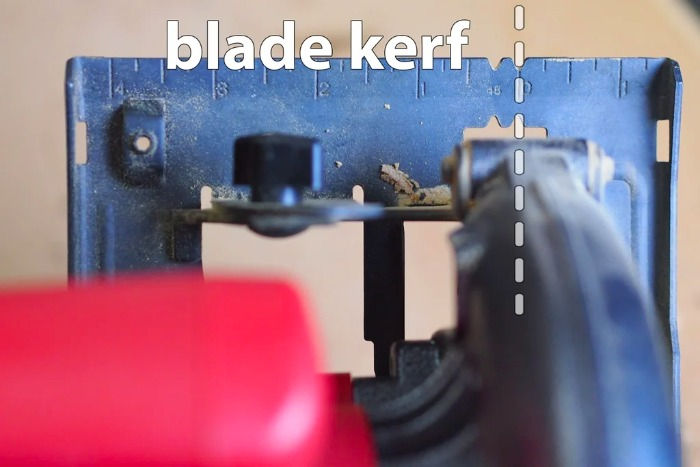
Kerf is the width of the blade of the tool you are using. It is the difference between the left and right side of the teeth. It is important to consider the kerf when cutting wood as it will detract from the wood.
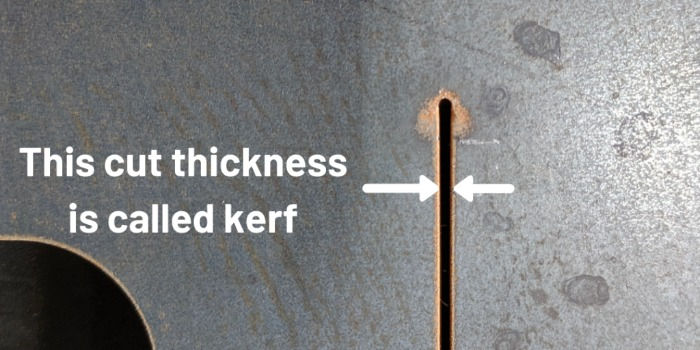
Many power tools have a kerf marker on the base plate so you know where the kerf will cut to. Depending if you cut on the right or left side of a piece of lumber, you can decide which side the kerf eats into.
Straight cutting
Being able to cut in a straight line is very important in carpentry. There are three techniques we can employ to cut in a straight line.
Speed square
You can use a speed square to draw a straight line with a pencil.
If you want to cut a wooden stud in a straight line, this is your best bet. Make sure you mark a straight line on two sides of the lumber when cutting to ensure you don't drift off course when cutting.

Chalk line
If you need to cut a straight line on a bigger surface (eg. plywood or board insulation), a chalk line is the way to do it. A chalk line is a piece of twine covered in chalk that you snap down onto a piece of wood to make a straight line.

Fence
Many power tools comes with a fence pre-installed (or allow for one to be attached). It is a metal runner that keeps you in a straight line when cutting.

If you do not have a fence attachment, you can DIY it by clamping down a straight edge which you will follow with the tool.

Cutting around awkward shapes with a scribe tool
A scribe tool is a pretty essential tool in the carpenter's toolbox. A scribe allows you to fit a piece of wood flush against an awkward surface. Here's a short video on how to use that scribe tool.

Plunge cut
If you need to start a cut in the middle of a piece of wood, you can do so using a 'plunge cut'. You can do this with a circular saw or a jigsaw (you need a U-shaped blade with a jigsaw).
Simply hold the front of the base plate against the wood and slowly lower the blade down into the wood.

Mitigating tear-outs and scratching
Tear outs occurs on the bottom side of the wood when using many power tools. The wood becomes flakey and breaks off. It doesn't look great.

There are a few things you can do to mitigate tear-out.
Option #1: Use a 'sacrificial' piece of wood. Place some sacrificial wood (waste wood / off cut) on the underside of the wood you are drilling/cutting to give it support - there will be no space between the good wood and the sacrificial wood - this is known as 'zero clearance'. This will prevent tearing out.
Option #2: Use a blade with more + smaller teeth.
Large toothed blades with few teeth will have more tear out than a blade with more small teeth.
Option #3: Slowing down how fast you cut the wood can help reduce tear out.
But, if you do get tear out, don't fret too much - you can always use sandpaper to help smooth it out.
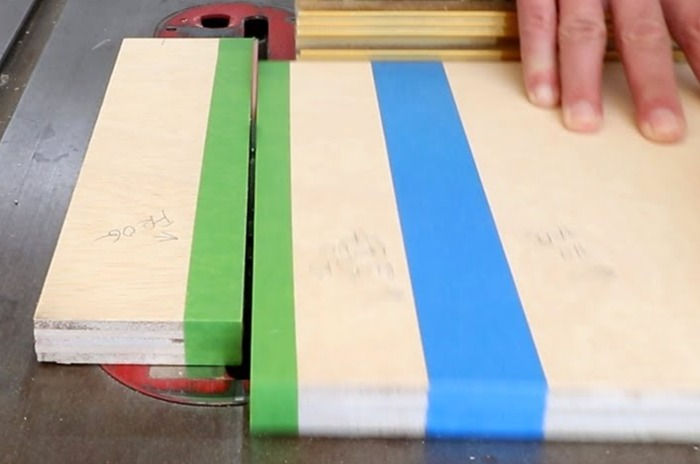
On the flipside of tear out is the scratching of the top of the wood as you drag a power tool along it. You can mitigate the scratching of wood by power tools by:
Sticking masking tape along the line you intend to cut (masking tape gets scratched, rather than the wood).
Cutting a piece of wood from the bottom side rather than the top.
Dimensions
Measure MANY TIMES, cut once. Always take the width of the wood into account when taking your dimensions.

Types of wood
All wood is either softwood or hardwood. Hardwood comes from trees that lose their leaves in winter (deciduous), they are slow growing a provide dense timber.
Some examples of softwood are:
Pine
Cedar
Bamboo
Western hemlock
Spruce
Some examples of hardwood are:
Balsa
Beech
Birch
Oak
The hardness of wood is measured on the 'Janka scale'. It measures the force required to embed an 11.28-millimeter-diameter (7⁄16 in) steel ball halfway into a sample of wood.

As a general rule of thumb, you want to use hardwoods in areas that will get a lot of use / are load bearing. Floorboards are the most important place to use hardwood.
Types of lumber
There are a three different types of lumber we will use in a van conversion:
Carcassing timber
Cladding
Timber sheet
Carcassing timber
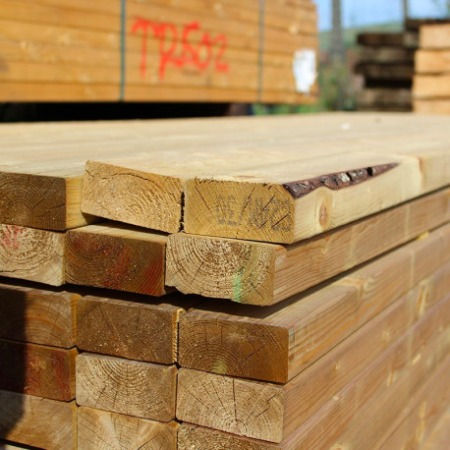
Carcassing timber is used to build the structural support of a campervan. It is the skeleton frame of the campervan furniture, the wall studs (furring) and roof battens.
Sizing
1X1, 2X1, or 2X2 (inch) will be fine for a van conversion
Moisture:
Good quality carcassing timber is typically 'kiln dried' - this dries the timber to have 20% or less moisture content. In many countries, it is a regulatory requirement for timber to have a low moisture content. It is critical that wood has a low moisture content to help prevent warping and mould.
Strength:
There are 12 strength classes of carcassing timber. You should only use a strength class of C16 or above (C18 or C24) in your van conversion.
Treated timber:
Treated wood is wood that has been treated with chemicals with the intent of prolonging its intended usefulness lifecycle compared to untreated wood. Preservatives are used to protect wood fibers from: structural degradation, fungi, or termites. Treated timber is typically used in outdoor areas that are exposed to the elements. I used some treated timber by the side and back doors of the van (rain occasionally gets in if the doors are open)
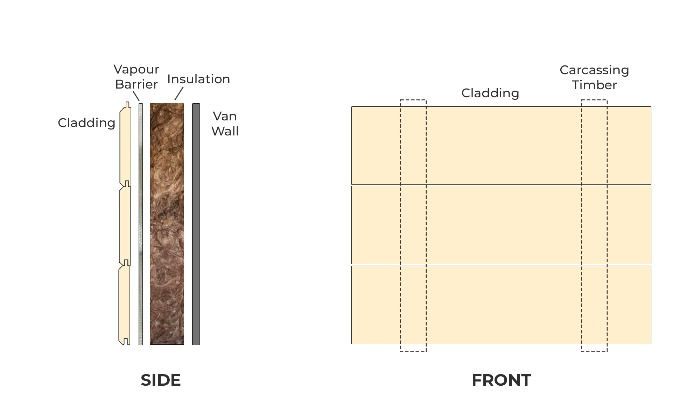
Cladding
Timber cladding is a popular and contemporary way of creating a beautiful finish to a campervan. It both looks great and provides protection.
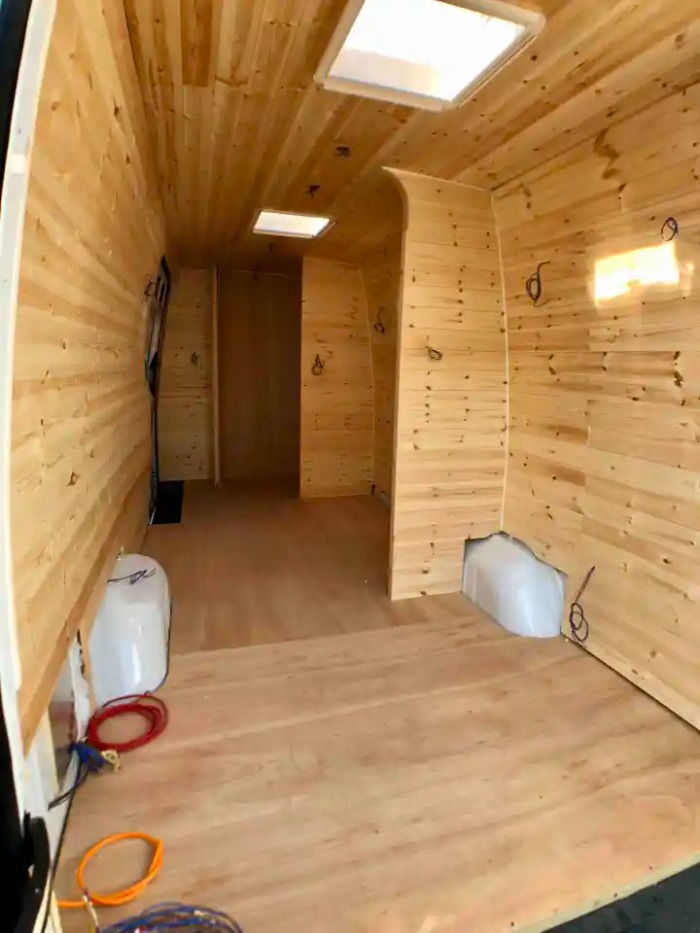
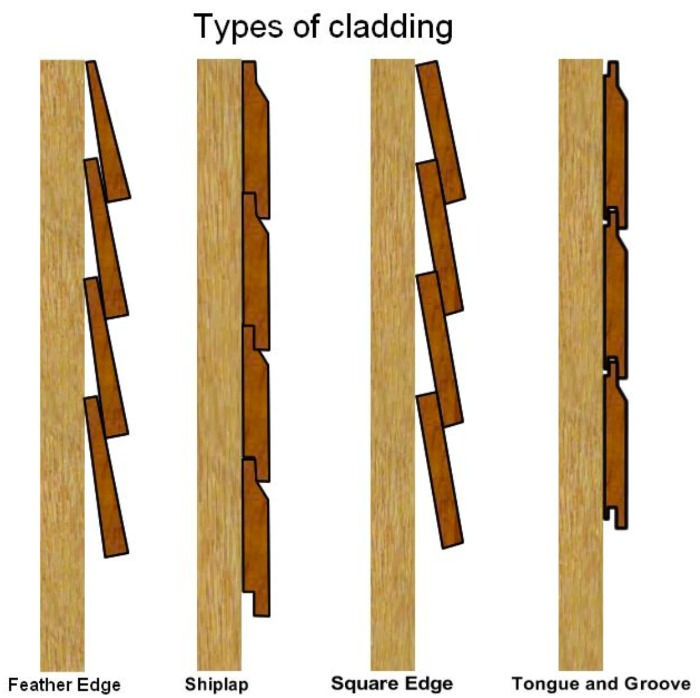
There are many different styles of cladding, including clapboard, dutch lap. beaded lap, shiplap, and the list goes on and on...
For van conversions, most people choose to go with tongue & groove. It is easy to get hold of and easy to install. The cladding just pops together.
Cladding can be used in many places for a van conversion - including for your campervan furniture. However most notably, it is commonly used for the van walls and van roof.
Timber sheet (Manufactured boards)
Timber sheet is also known as manufactured board - it comes in large rectangular sheets. It is incredibly useful in a van conversion.
It is made from wood / wood products including:
Veneers
Sawdust
Wood fibres
Wood strips
Wood flakes
There are a few types of timber sheet that we should concern ourselves with:
Plywood
Fibreboard
Particle board
Laminboard
Plywood
Plywood is the most well-known timber sheet. It consists of veneers of hardwood or softwood that are glued together.
Grade:
There are four grades of plywood: A, B, C, and D. In that order, they go from the highest quality to the lowest quality. Lower grades than A will start to have some knots / point of weakness.
'Marine plywood' is considered to be of very high grade - it is cross-laminated (each ply is perpendicular to the last) making it capable of withstanding the elements better.
Number of ply:
3-ply is the most common, It is used indoors in more decorative places.
5-ply is more sturdy than 3-ply. We commonly use 5 ply for areas that more need structural integrity in the van.
Multi-ply ranges from 7-ply and continues upwards. 7-ply would be the absolute max you should consider in a campervan.
Sizing
10mm plywood is most common for van conversions.

Laminboard
Laminboard is a timber sheet consisting of strips of softwood placed side by side and sandwiched between veneer panels. It is considered to be of higher quality than blockboard (though very similar).

Lamin board is used in places where you need a tough material to hold up weight, such as shelves.
Fibreboard
For thousands of years humans sought fruitlessly to make use of saw dust - the useless by-product of the saw mills. It was only in the 1900's that we figured out some useful things to do with it. One of those things was fibreboard!
There are three types of fibreboard:
Low density fibreboard (LDF)
Medium density fibreboard (MDF)
High density fibreboard (HDF)
MDF is the most well-known of the three.
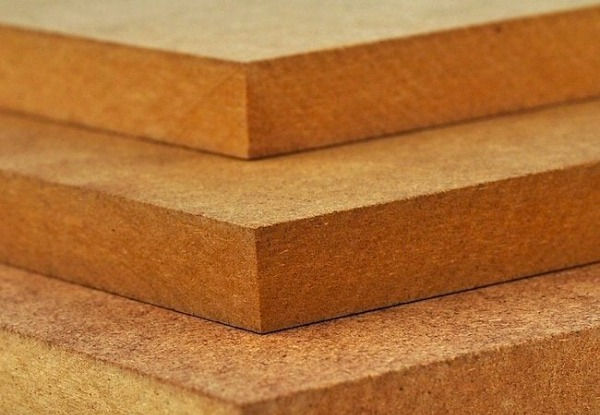
Though fibreboard can be a useful material in some circumstances, it is generally not recommended for van conversions. It is a weak material that doesn't deal well with humidity. If you are going to use it, it should be in a purely decorative location and you should paint it.
Particle board
Particle board consists of a bunch of small chips bonded together under pressure. The most well-known particle board is Sterling (OSB) board.
OSB board has greater strength than chipboard - however I advise against it for van conversions. It is incredibly heavy and not as durable as plywood. It tends to flake off a break, especially when it comes into contact with water.

80/20 Extruded aluminium
Extruded aluminium (80/20) has become increasingly popular in recent years for van conversions. It is lightweight, strong, and very extremely durable. It can be used to build everything from the kitchen unit, to overhead lockers, and even the bed.Extruded aluminum 'campervan furniture' is built with 3 things: extruded aluminum profile lengths, connectors, and bolt/t nut combos.
If you're interested in doing an 80/20 build, Here are some excellent extruded aluminum guides.
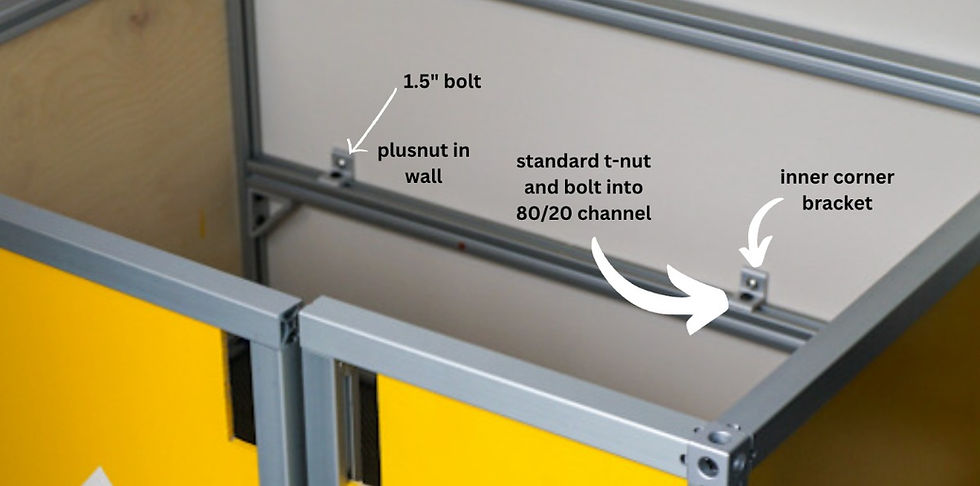
"As engineers who live and work full time on the road, and who are also obsessed with adventure, we wanted our rig to be space efficient, lightweight, easy to service, and reliable on the intense forest roads we would take it down. For these reasons, we decided to convert our camper vans with extruded aluminum (80/20). While there is a bit of a learning curve to working with this material, and of course a higher cost, this choice has truly paid off over the years of adventure our rig has seen. Our modules have great airflow due to the compactness and moisture resistant nature of aluminum. All of the components in our rig are easy to service as all we need to do is remove a few bolts to get around our buildout. And, the strength and reliability has been un-matched." Colby and Eric - Engineers Who Vanlife
Glue
Glue is an essential tool for the van converter - the joints of your camper van furniture are stuck together using glue. In particular, you will need to get your hands on some wood glue (PVA glue).
The two most popular brands of wood glue are titebond and gorilla glue .
Making a good joint with wood glue
There are two aspects to a good wood glued joint:
1. Total surface area
For glue to function best you want as much surface area touching between the two pieces of timber as possible.
2. Grain direction
A joint along the direction (straight grain) of the grain will be stronger than one that is against the grain (cross grain). Essentially, you want the grains of the wood to match up to get the best bond.
Make sure you have a good selection of clamps when you are woodworking with glue. Sash clamps and mitre clamps being very useful.
Ensure you always place newspaper on the surface you are working on - the glue gets everywhere!
Sanding
Sanding is an essential part of woodwork, it serves to remove imperfections on walls, ceilings, camper van furniture, floors, etc. It is also used to roughen surfaces too glossy for paint.
The coarseness of sandpaper is defined by its grit.
Grit sizes
Coarse grit (40-50): For rapidly removing material to shape wood, or to rough up a surface in preparation for gluing. Medium grit (60-80): For sanding smooth a surface after it's roughly the shape you want. These grits will remove tooling or abrasion marks from coarser sandpaper grits. Fine grit (80-120): For bringing a nice smooth finish to an already relatively smooth surface, can increase the sheen and will remove abrasion marks from medium grit sandpaper - great for preparing a surface for finishes. Very fine grit (150-220): For an even finer sanding finish - perfect for preparing a surface for finishes. Micro grits (240-3000): used as a sanding in between coats of finishes or paints.
In the essense of keeping it simple, van converters need only concern themselves with three grits: 80, 120, and 220.
Sandpaper technique
For the best results when sanding, it is best to start at a low grit and work your way higher.
Sand everything in your van! Leave no sharp edges in your van.
The difficulty of sanding directly correlates to the hardness of the wood you are using (according to the Janka scale).
A random orbital sander is going to be your best friend when sanding wood. Using a power tool for this job is going to save you a lot of time, back ache, and frankly do a better job.
However, there are times when we will have to sand by hand too. The most effective of way by sanding by hand is to wrap the sandpaper in an offcut piece of carcassing timber.

Bevels & mitres
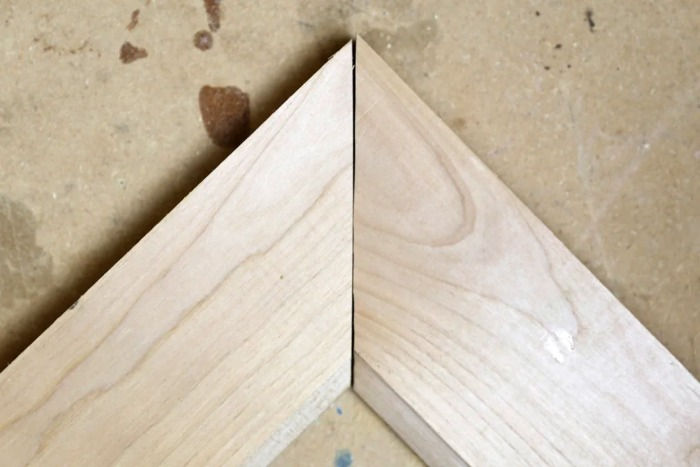
Bevels and mitres are angled cuts in wood (usually at 45°). They are commonly used in joints as they look quite nice.
A bevel is an angled joint on the narrow side of the lumber:

A mitre is an angled joint on the wide side of the lumber:

While there are many ways to cut bevels and mitres, they are usually cut with a mitre saw.
If you don't have a miter saw, you can do the same thing using a speed square or a mitre block.
You can also cut 45° bevels in wood (with some skill) using a chamfer bit for a router.
Another common way of making angled cuts in wood is with a circular saw. The circular saw pivots on the base to allow for the angled cuts
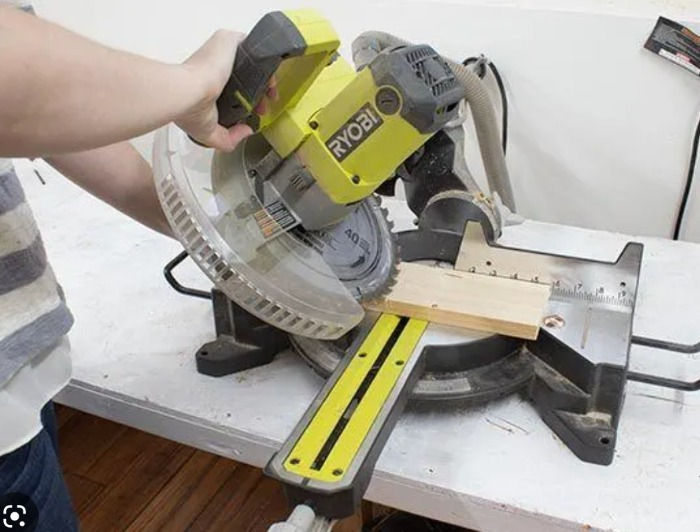
If your bevel / mitre joint is not truing up - ie. there are gaps in the joint, sand down the joint with some 150 grit sandpaper to even it out. For best results place a rotary sander face up (with the 150 grit sandpaper) and press the wood into it.
Joinery
Joinery is a woodworking technique for connecting two pieces of wood to create a 'joint'. It can be one of the most technically complicated parts of carpentry (depending on which type of joint you use). In a van conversion, we use joints for building campervan furniture (eg. shelves).
There are three styles of joints:
Corner joints (commonly used for the camper van furniture carcassing)
T joints (use for building shelves)
Edge-to-edge joints (not commonly used in a van conversion)
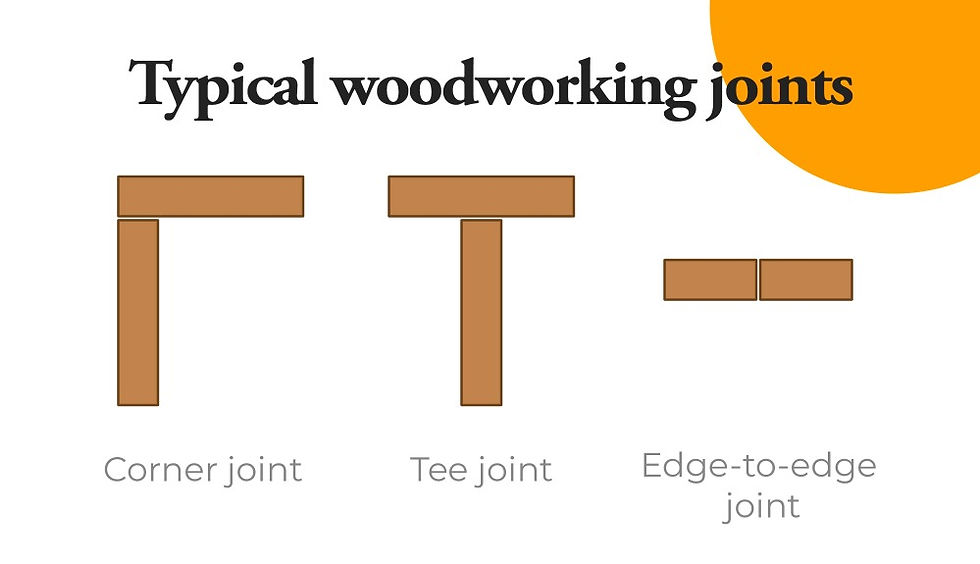
There are many ways of engineering joints for each of those three styles.
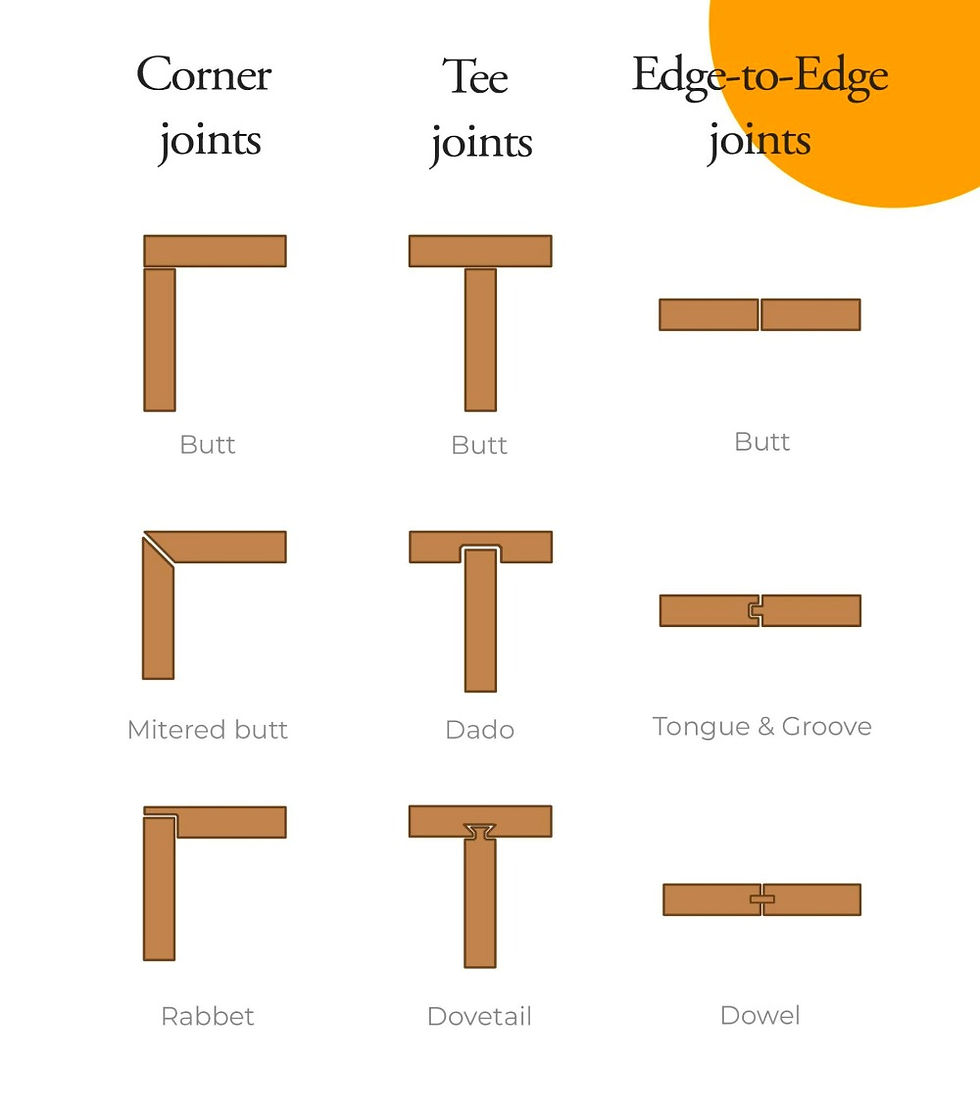
The most common corners joints are:
Butt joint
Mitered butt joint
Rabbet joint
Dowel joint (more technical, but sometimes used)
The most common T joints are:
Butt joint
Dado / Stopped dado joint
Sliding dovetail
Joinery with screws
For the best finish, wood glue should be used with these the joints mentioned above.
However if you are a less experienced woodworker or not overly concerned with appearances, you can also use screws to make the joint. Screws are normally only used for simple butt joints.
Simple screw joint
The simplest way to create a joint of this kind is to screw a self-tapping screw into the butt joint from a place where it will not be seen (bottom/back). But beware; a single screw creates a very poor/shaky joint. You should use two screws where possible.

However, this is quite a 'brute force' way of making a joint. There is a better, easier, stronger, and more visually appealing way of making a joint with screws: Pocket holes.
Pocket holes:
Pocket hole screws (also known as kreg screws) are screwed in at an angle. They look well, and for thicker joints, there is often no option but to use pocket holes.

In order to do pocket hole joinery, you will need to grab yourself a pocket hole jig. They are cheap and easy to use! Here is an excellent deep dive video on how to use pocket holes correctly.
Angle Brackets
Another quick and dirty way to make a joint is with angle brackets! These steel brackets are pretty strong and very easy to use!

Cabinetry
Cabinetry is the craft of making cabinets, shelves & camper van furniture. It is an almost infinitely fine art.

For a van conversion, there are two types of cabinetry we can concern ourselves with:
The carcassing method
The dado & rabbet method
The carcassing method
The carcassing method is the simplest method of cabinetry and best for beginners. In this method, we build a skeleton frame out of carcassing timber. If we mess up our measurements, it's no biggie! We can easily adjust the frame.
We screw the ply lining and shelves directly into the carcass.

Unfortunately there are a few downsides to the carcassing method...
The biggest problem with the carcassing method is that it creates heavy campervan furniture (which is pretty bad in a van conversion).
Carcassing doesn't look anywhere near as nice as the dado & rabbet method.
Fitting shelves into the carcass can be a little tricky.
The carcassing method takes a lot longer than the dado & rabbet method
The dado & rabbet method
In this man's humble opinion, it is far better to get yourself a router and learn the dado & rabbet method! With this method of joinery, the timber sheet simply slots together and can be secured with glue. Rabbet joints are used at the top and (optionally) bottom and dado joints are used for any shelves in between.

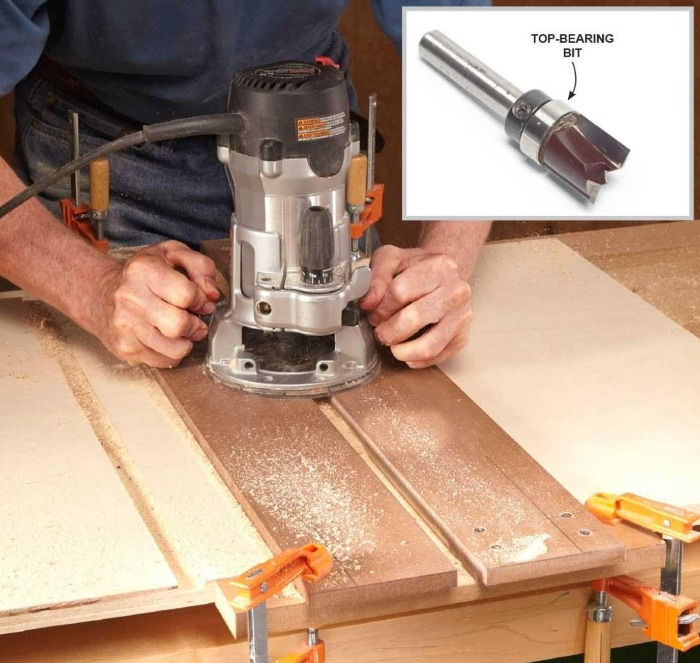
One very important aspect to consider when doing dado & rabbet cabinetry is to account for the depth of the router trench in your initial measurements. You could find yourself with a lot of waste wood if you don't carefully consider your measurements first. The router bit you use will tell you the depth of cut.

When cutting dados for shelving, it is best to setup a jig to keep your cut straight. Two straight edge pieces of lumber as a fence on either side will do the job just fine! Use a straight bit with the bearing on top.
The forces acting on your woodwork
There are four forces that can act on a carpentry joint:
Tension
Racking
Compression
Shear

At the very least a joint must be able to withstand shear force, and optimally racking too.
Oftentimes a weighted shelf will put a lot of shear force on the joint supporting it. This can easily break the joint if not built correctly.
Screws are not built to withstand much sheer force (unlike bolts). For this reason, when building cabinets using the carcassing method, you should place horizontal carcassing timber directly on top of the vertical timber. You should not screw the horizontal timber into the side of the vertical as it is more likely to break off. See the image below.

Drawers and Catches, Hinges, and Handles
Drawers
Drawers are very common in van conversions - they are very useful and relatively easy to install.
First you must create a frame with carcassing timber - join them in whichever way is easiest for you - pocket holes (outwards facing on the side timber) will do just fine. Install a base to the shelf using plywood. The plywood can rest on some partial carcassing (thin batons as shown in the photo below).

Once you have built the drawer, you will need to get your hands on a sliding rail. One half of the sliding rail is installed on the drawer and the other half is installed on the inside of the cabinet.

Catches
A catch is anything that will hold your drawer closed. See, as soon as you get in your van and drive away, anything not secured down will fly all over the place. Every door, and drawer must have a catch!
Here are the most common catches you will see in van conversions:
Handles
In order to open the drawer, you will need some sort of opening device. You can use either handles or knobs.
Hinges
Due to the shear number of ways in which it can be done, hinges can be a surprisingly complex part of cabinetry to get your head around.
There are two types of hinges:
Surface mounted hinges
Mortise hinges
Surface mounted hinges are the simplest to install as they do not require a router (or similar) to install. They simply are screwed onto the face of the wood. If you have a router/chisel, you can recess a surface mounted hinge for a better finish.
Mortise hinges on the other hand is a hinge installed into a shallow cut (recess) in the wood. A mortise hinge gives a beautiful, flush finish.
Surface mounted hinges
The most common types of surface mounted hinges for van conversions are:
Butt hinge (easiest to install!)
Flush hinge (gives a 'flush' finish)
Cranked hinge (for creating overlay doors - gives a great finish!)
Gas strut (Fantastic for overhead lockers!)

Mortise hinges
Any hinge that is recessed into wood can be considered a mortise hinge (including a butt hinge that has been recessed in).
However, some types of hinges are always recessed. Namely: concealed hinges.
Concealed hinges are very useful, pretty, and common in houses. If done correctly they can add a lot to your campervan!
There are three types of concealed hinges:
Full overlay (front face covers the side of the cabinet)
Half overlay
Inset

In order to install a concealed hinge, you will need to cut a circular divot in the door using a forstner drill bit attachment.
Collorant & finishes
Once your beautifully cabinetry is complete it is vital that you paint/finish it! If you don't treat the wood, your fine craftsmanship won't last long before getting spoilt.
You have two choices, you can use either a collorant or a finish. Let's look at both of those in a little more depth...
Colorant
There are two main types of colorant that we should concern ourselves with:
1. Stain
Wood stain leaves the grain of the wood visible after it is applied. Many brands of wood stain protect wood, but some are purely cosmetic.
Wood stain can come as a dye or a pigment. Dye is effective for fine grained wood. Dyes are translucent and pigments are opaque. And while it is possible to buy either dye or pigment, these days Most stain now contains a mixture of both.
Wood stain is applied in layers (2-3 coats) using a brush.
2. Paint
Paints come either as a latex paint (acrylic), or oil. Latex paints are easier to clean up as they are water soluble and have a low odor. Oil paints are more durable and great for resisting water, but will require a solvent for clean up.
It is important that you first apply a primer to the wood before painting - it helps paint adhere to the surface and keep its true colour.
Bonus: Shellac
Shellac is a resin secreted by the female lac bug on trees in the forests of India and Thailand. Weird.
It gives a high gloss, food safe, protective finish.
Finish
Wood finishes exist to protect your wood from wear, tear, and the elements.
There are four main types of wood finishes:
Varnish
Varnish is a transparent finish that is usually glossy in texture. It is very protective but dries slowly. Varnish is frequently used on the surface of shelves to protect them.
Polyurethane
Polyurethane is one of the most popular finishes. It is very good for protecting the wood from wear and moisture. Polyurethane can come in a matte or a gloss finish.
Finishing oil
Finishing oil is normally made from a naturally occuring material. Finishing oil can give a beautiful, warm colour to wood and is generally food safe (always check!).

The most common finishing oils are:
Linseed oil
Tung oil (particularly good for food prep areas)
Danish oil (a superb oil to finish tongue and groove cladding).
Finishing oil is applied in layers (3 coats for Danish oil) using a microfiber cloth. Leave 24 hours between each coat. There is a lot of off-gassing when applying finishing oil, so it is important that keep the van well ventilated when using it and wear a mask!
Epoxy
Epoxy is a very, very strong finish. It is thick, hard, and totally waterproof. It is probably overkill for camper van furniture, but certainly has its place! It is commonly used for repairing rust in a vehicle.
Applying colorants & finishes
Colorants and finishes can be applied with either a chip brush, foam brush, or a lint-free rag (t shirt) - depending on the substance.
Make sure you always wear gloves when applying these substances.
If you are using a colorant or finish in an area where you will be working with food, check if it is food safe! Polyurethane and epoxy are not suitable, whereas mineral oil usually is.
Finishes and colorants can look very different depending on the wood they are applied to. Best to test out the finish on an offcut first before doing the real thing.
Suggestions for your van conversion
Tongue and groove cladding is frequently the most abundant wood in a campervan (roof and walls). Here are some of the most popular (and nicest looking) finishes for cladding:
Indian rosewood stain
French oak stain
Poplar or birch natural stain
White paint + clear varnish
Danish oil
What did I do?
Tongue & groove cladding: Danish oil
Camper van furniture: Light oak stain
Shelves: clear varnish
Woodworking tips that will REALLY help
Draw your plans!
Before laying into the carpentry, it is essential that you draw your plans first.
Some people choose to do this with a pencil and paper. For a simple piece of camper van furniture, sometimes a rough sketch will do. But if you are building anything intricate, a scaled drawing is probably best. Scales of 1:5 or 1:20 are normally used for metric, whereas 1:4 and 1:24 are used for imperial.
A compass, triangle, protractor, and ruler will be needed for pencil & paper plans. You can easily buy a geometry set online.
Three views of the object are typically drawn: Front elevation, side elevation, and plan. Sometimes a Section view is drawn which is a cross-sectional side elevation view.

If you are more of a techie, you can use a CAD software instead to mock up the woodwork. AutoCAD, Shapr 3D, and SketchUp are some of the best known.
Sketchup is the most used in the van conversion community, in no small part due to Greg Virgoe's excellent tutorials.
I have written an entire guide to van conversion planning and design which you can read here.
Edge filling plywood
Frequently when working with plywood (especially low quality plywood) you will find gaps on the edges where you have cut. This is caused by air bubbles in the plywood. To fix this, you can fill it with wood filler and sand it back. This gives a really nice finish to the edges but requires a lot of sanding.

If you want to get a really neat finish on the edges of your plywood you can use a thin strip of adhesive veneer called edge banding.

Screwing near the edge of wood
If you drive a screw near the edge of a piece of wood, there is a high likelihood that the wood will split. To avoid this, drill a pilot hole in the wood first. Make sure your pilot hole is smaller than the width of the screw!

Fixing exposed screws
It is a common occurance in a van conversion to have an exposed screw thread popping through somewhere. Luckily this is a (relatively) easy fix!
You can remove the exposed part of the screw using a hacksaw or bolt cutters. You can then file down the exposed part of the nail using metal file.
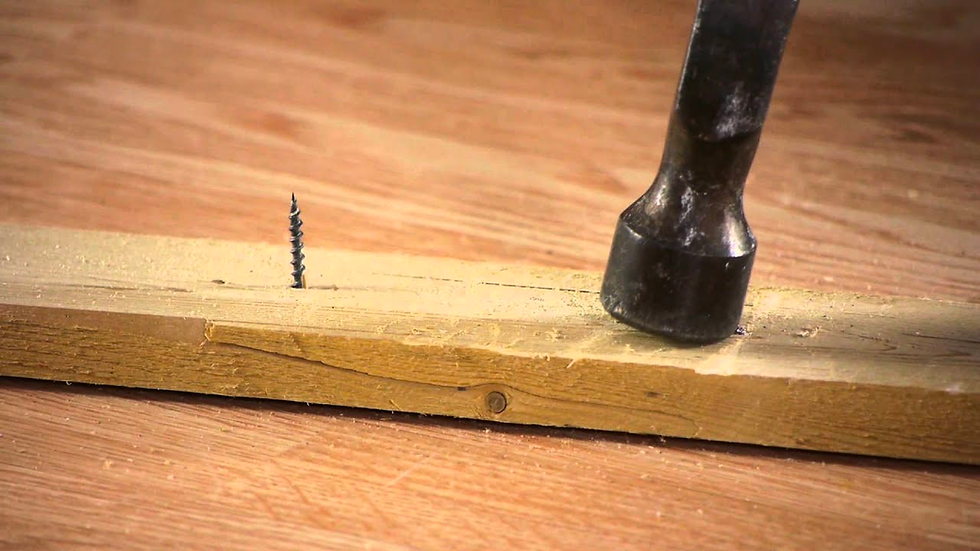
Removing stripped screws
A stripped screw head is intensely annoying - even more so because it’s completely your fault… Whilst there are many ways of dealing with this problem, the easiest solution is to purchase a screw extractor kit. They are very cheap.
Dealing with Shrinkage
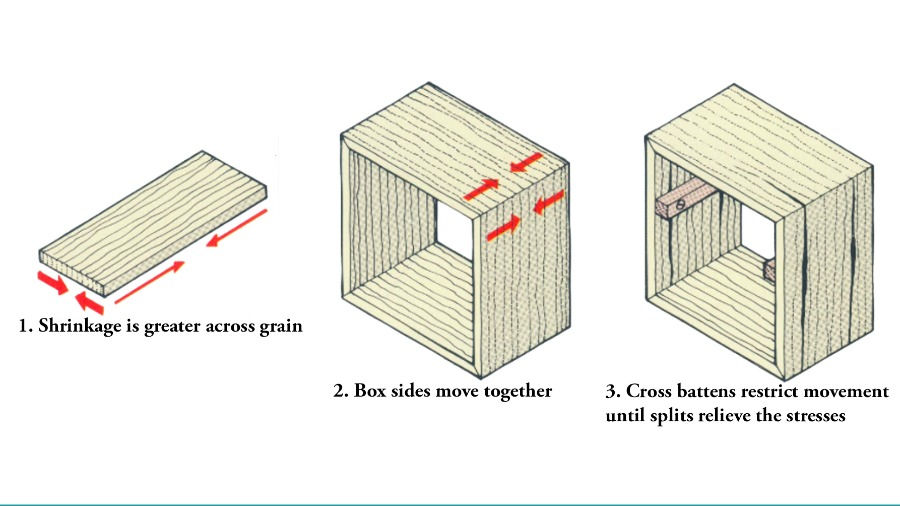
Shrinkage in wood occurs when the wood dries over time and the wood contracts. These days the use of scrap wood / pallet wood is quite common to give a 'bohemian' feel. These types of wood are far more likely to exhibit shrinkage over time. In comparison, processed wood (especially kiln dried) experiences less shrinkage.
Shrinkage is greatest across grains. So be wary when installing cross battens as the wood could split under pressure after time.
Tape the ground where your campervan furniture will go.
Before building camper van furniture, it can be very helpful to put masking tape on the ground so you can see where everything will fit before you get stuck in.

Batching
Batching is a key tenet in the world of productivity. In no place is this more important than in woodworking. If you have a job to do, batch the tasks! For example, if you need to take measurements inside the van, cut several lengths of carcassing timber, sand it, and then screw it together as a frame, do these tasks individually.
Take all the measurements in one go. Cut all the wood in one go. Sand all the wood in one go. Screw everything together in one go.
Batching when you are woodworking will save you countless, countless hours.
I have written up a guide to van conversion project management & productivity which you can find here.
Measure twice, cut once.
Sorry to drill home this age old adage... but measure twice, cut once!
List of campervan furniture
Here is a list of some ideas for campervan furniture - with a build guide for each:
Ergonomic furniture dimensions
Some furniture is very simple to build, some is more complex. But no matter what you build, it is important to consider ergonomics. Poorly built furniture and storage will look funky, function poorly, and quickly give you a very sore back trying to get to it!
Storage Dimensions
Maximum shelf height: 1.8m
High shelf - This is too high for most vans
Book shelf height: 1.6m
Standard eye height
Lowest shelf above kitchen unit: 45cm above kitchen unit
Any lower than this and you start to obscure the view of the back of the worktop
Kitchen Unit Dimensions
Standard Kitchen unit height: 90cm
Standard Kitchen unit Depth: 60cm
Shelf above a kitchen unit: 1m above the kitchen unit
You can just reach a shelf of this height when leaning across a standard kitchen unit. This is usually the bulkhead storage which happily coincides with these dimensions
Campervan overhead lockers depth: 30cm
You can just reach the back of a shelf of this depth when leaning across a standard kitchen unit
Depth of a sliding drawer: 50cm
Standard depth of a sliding drawer
Depth of a wardrobe: 60cm
Standard depth of a sliding drawer
Crouching space in front of a low cupboard: 1m
Allow this space in front of a low cupboard
Crouching space in front of a low cupboard with open sliding drawer: 1.25m
Allow this space in front of a low cupboard with a sliding drawer

Conclusion
This crash course should have given you a primer on the important aspects of campervan carpentry. You should now be ready to dive into our guides on specific woodworking projects, including wall cladding, overhead cupboards, and kitchen units.
Before you get started, make sure you check out the excellent VanSpace3D for experimenting with your furniture layout and design.
If you're still confused, consider our carpentry masterclass for an in-depth, step-by-step course on the whole process.
Don't forget to subscribe to The Van Conversion Newsletter for everything you need to get started with your own van conversion. We'll send you a free wiring diagram when you join.
If you're looking for some guidance with your van conversion, you might be interested in our book, Roaming Home, or in our online course, The Van Conversion Mastery Course. You'll learn directly from our founder Shane how to convert a van into your dream home - no prior experience needed. Shane also offers one-to-one consultations, where he'll help you with any aspect of your build in a face-to-face video call. All consultations come with a free copy of Roaming Home and our Diagram Pack.
Finally, our Van Conversion Ultimate Guide lays out the whole van conversion process in easy-to-follow sections with tools, materials, and step-by-step instructions. It's the perfect companion for your van build.
Until next time.


